Setting Up #
Project Folders #
First things first, we’ll create a few folders to stay organized.
Create a folder on your C:\ drive named learn-lua, and two more folders inside that one, named bin and source respectively. If you’re already comfortable doing that, go ahead and create them now, or follow the steps below.
Step By Step - Creating Project Folders
Open Windows Explorer, and find your C: drive in the left hand side, you might need to expand “This PC”.
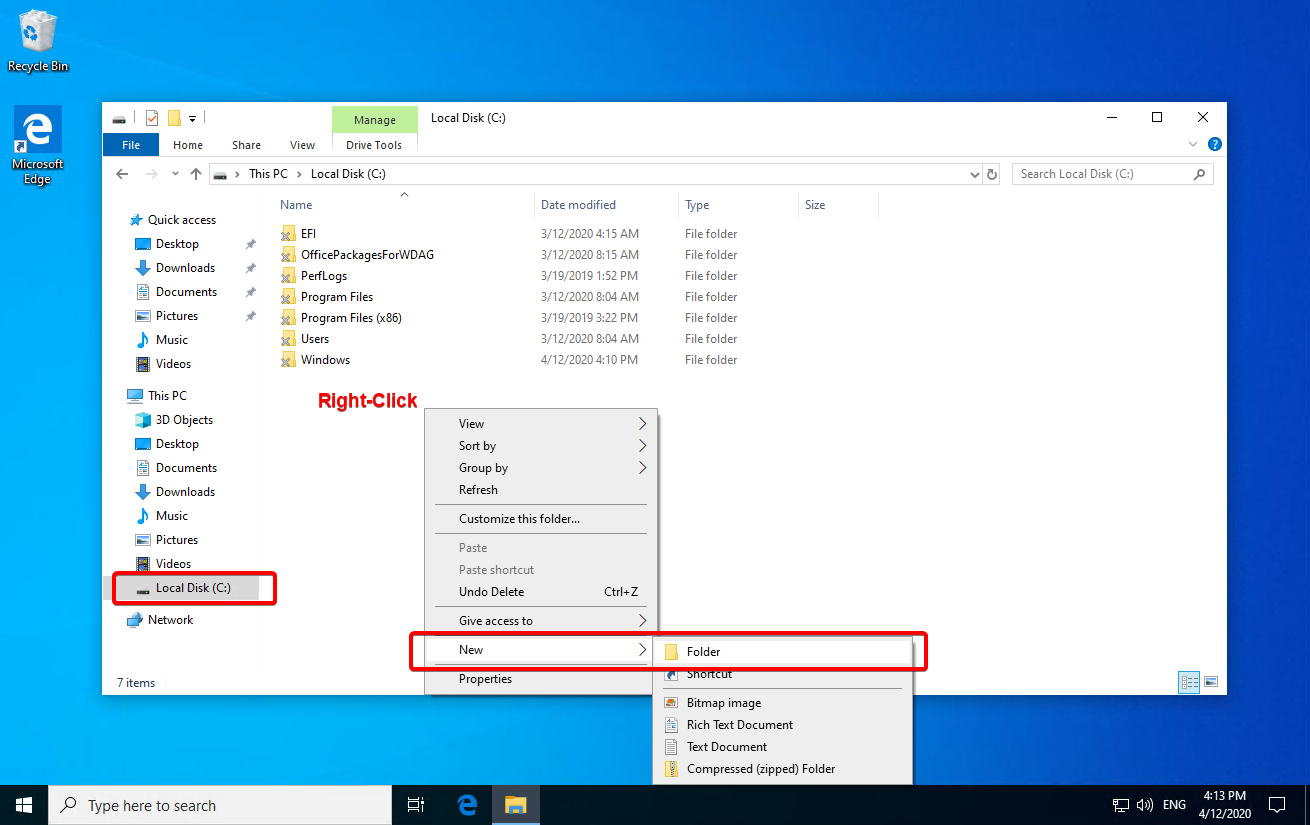
Left click on your C: drive and right click in the empty space on the right. Select New > Folder.
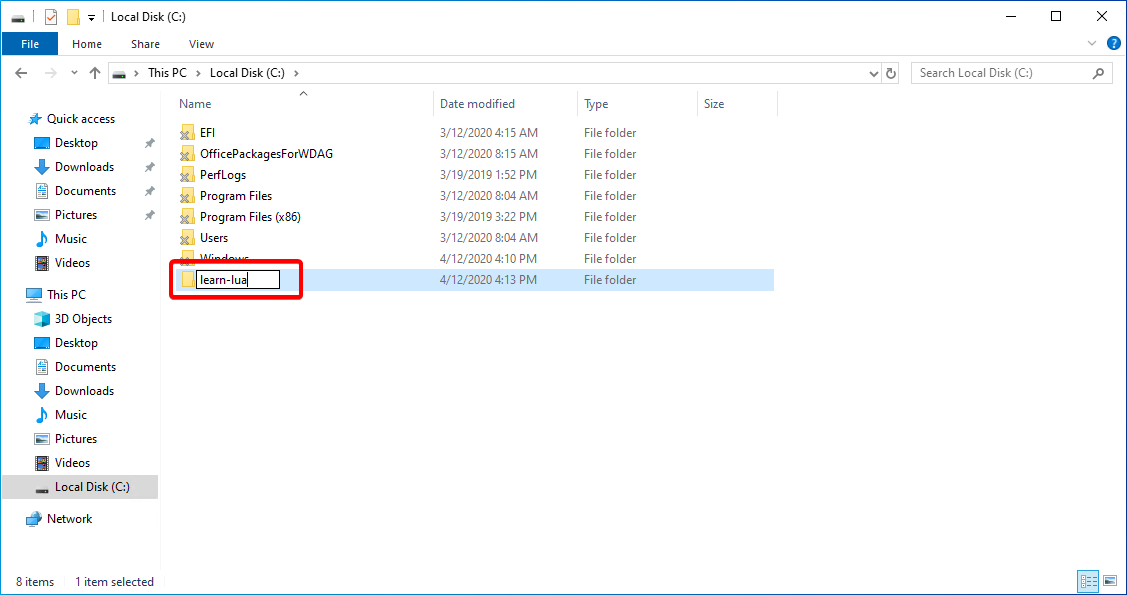
Name the folder learn-lua and hit Enter
Open the learn-lua folder you just created, and create two new folders inside that, one named bin and one named source.

Open the learn-lua folder, then repeat the process to create two new folders named bin and source.
You should end up with a folder structure like this:
C:\
learn-lua
binsource
In the bin folder we’ll put the binaries for the Lua interpreter, and in the source folder we’ll keep the scripts (source code) that we write.
It isn’t particularly important which drive you use, or what you call the main folder, so feel free to use a different drive or folder name if you feel like it.
Downloading Lua #
Next, you’ll need to download the Lua interpreter in order to run the Lua scripts that you’ll be writing.
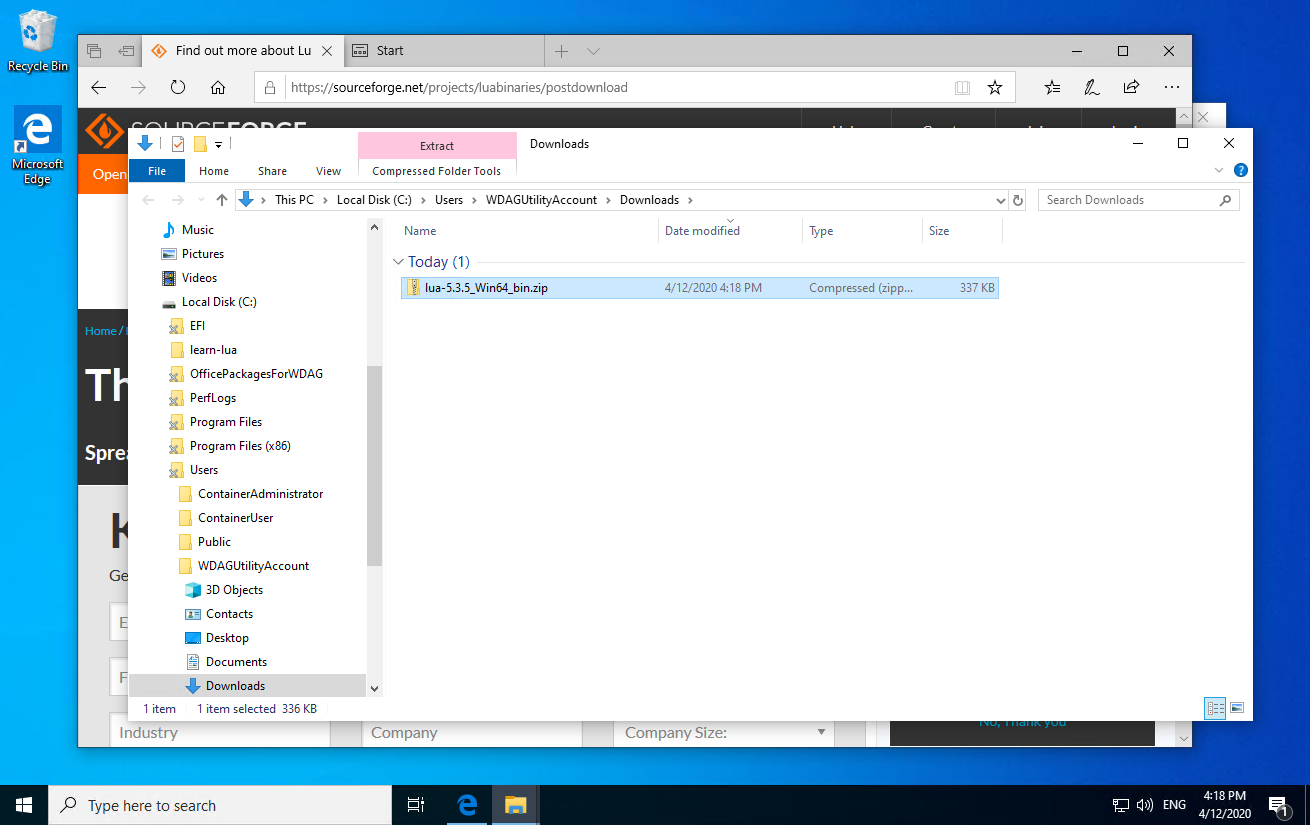
Go to the LuaBinaries Downloads Page and download the latest Win64_bin zip file for version 5.3.x.
Look for the most recent file labelled Windows x64 Executables, at the time of writing this was lua-5.3.6_Win64_bin.zip
In the event you are still running an old 32-bit version of Windows, simply grab the Win32_bin Windows x86 Executables instead.
Open the .zip file that you downloaded, and extract the two files lua53.exe and lua53.dll into the folder c:\learn-lua\bin that you created earlier.
Step By Step - Extracting Lua
Find the downloaded .zip file, and double click to open it.
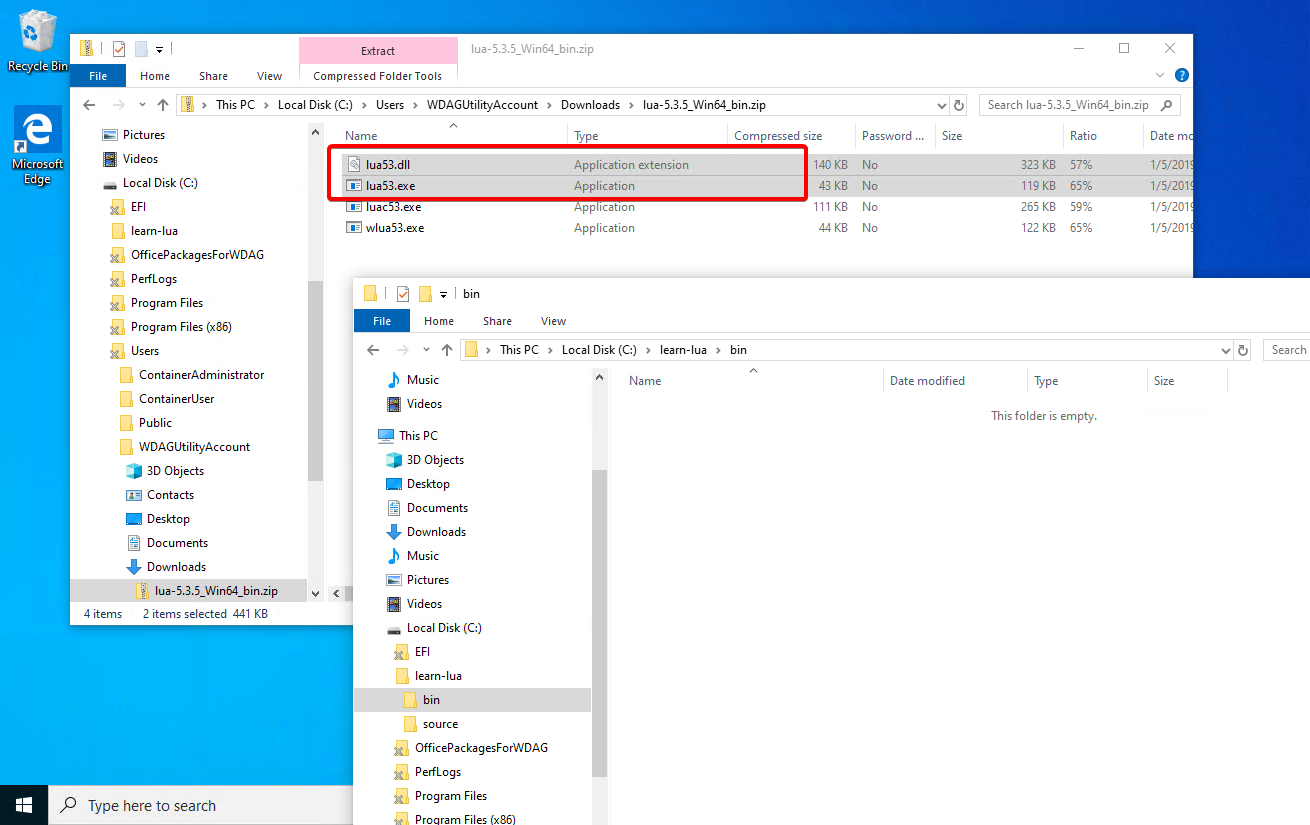
We only need the files lua53.exe and lua53.dll. Open a Windows Explorer folder to the bin folder we created as well, so you can drag the files over.
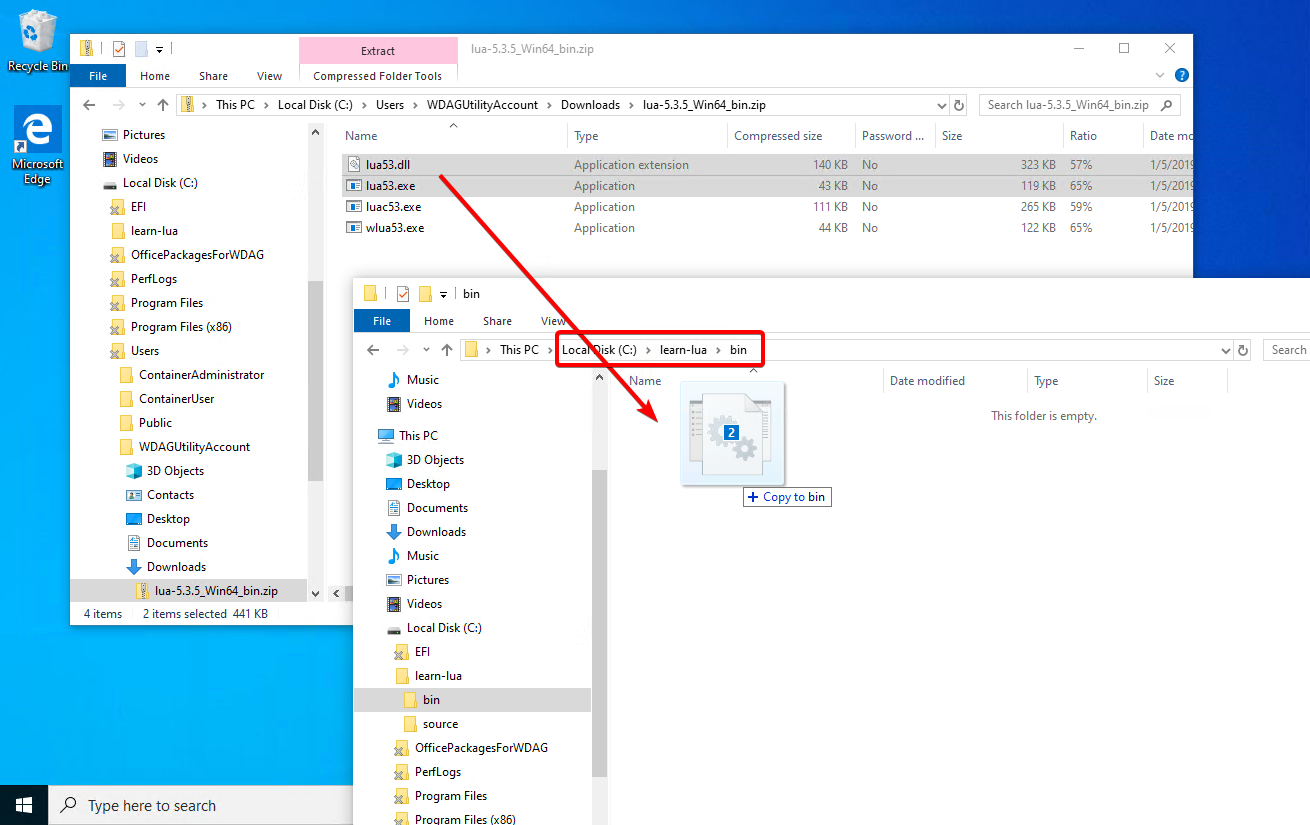
We only need the files lua53.exe and lua53.dll. Select each one, and drag and drop them from the .zip into the bin folder that we created earlier.
It’s fine if you want to just extract all of the files from the .zip into the bin directory. This tutorial won’t be making use of luac.exe or wlua53.exe
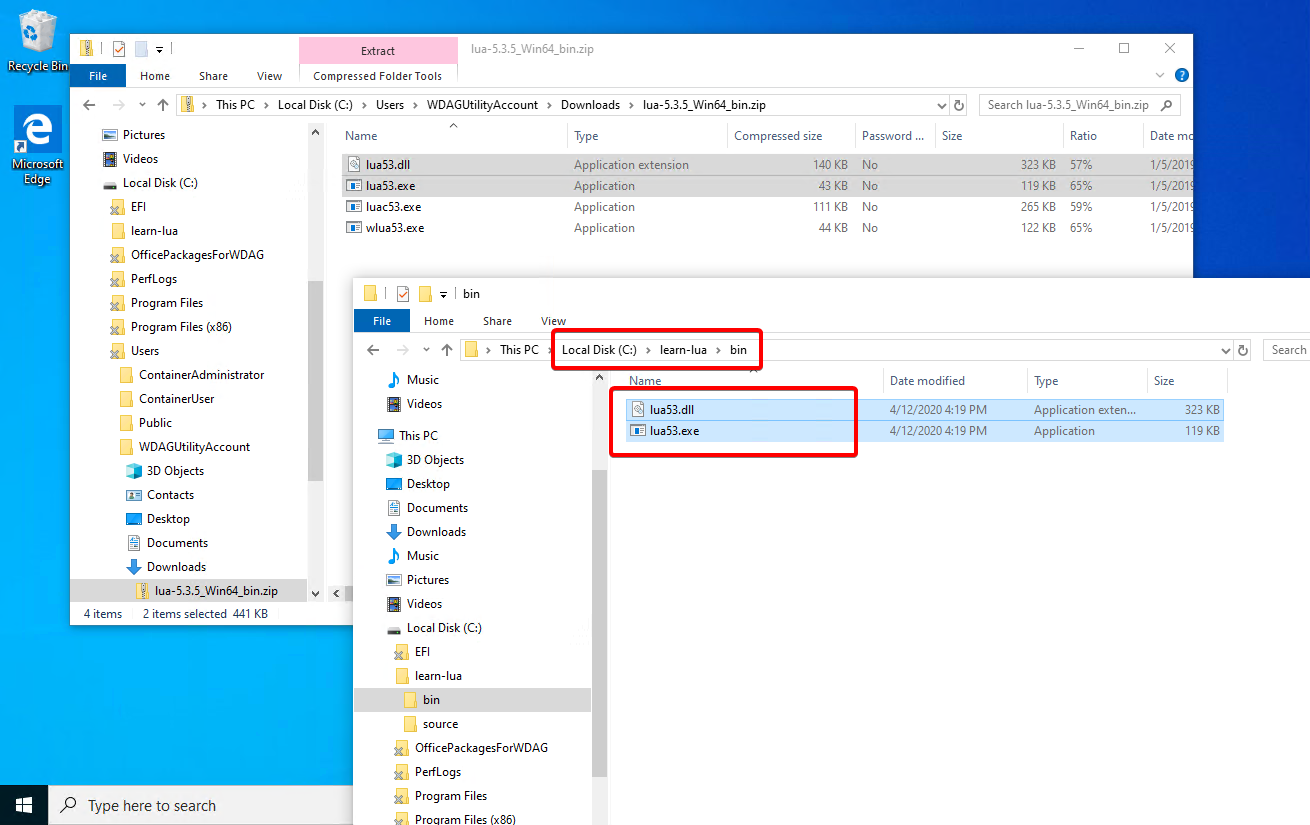
The files we need, extracted to the bin directory.
Running Lua Interactively #
Open the bin folder and double click the lua53.exe program to launch it in interactive mode:
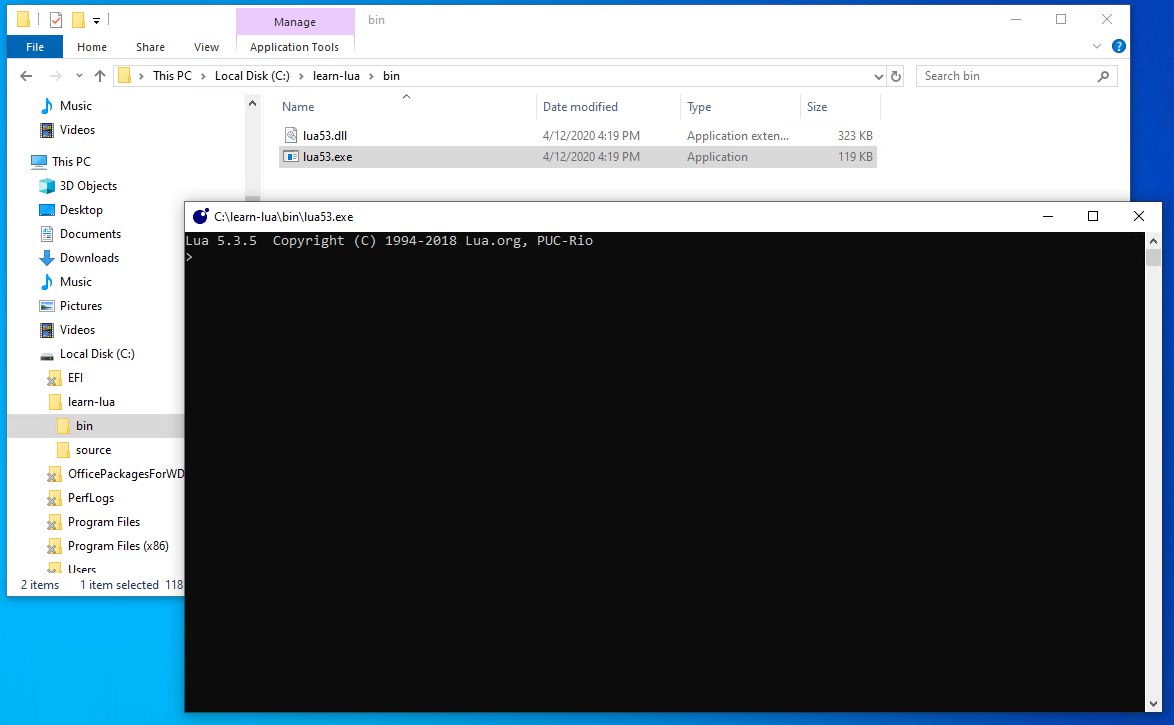
This is the Lua interpreter running in interactive mode.
You can type Lua statements into this window, hit Enter and it will try to run each line of Lua code you’ve typed immediately. If whatever you typed isn’t valid Lua for some reason, the interpreter will print out a (hopefully informative) error message letting you know something went wrong.
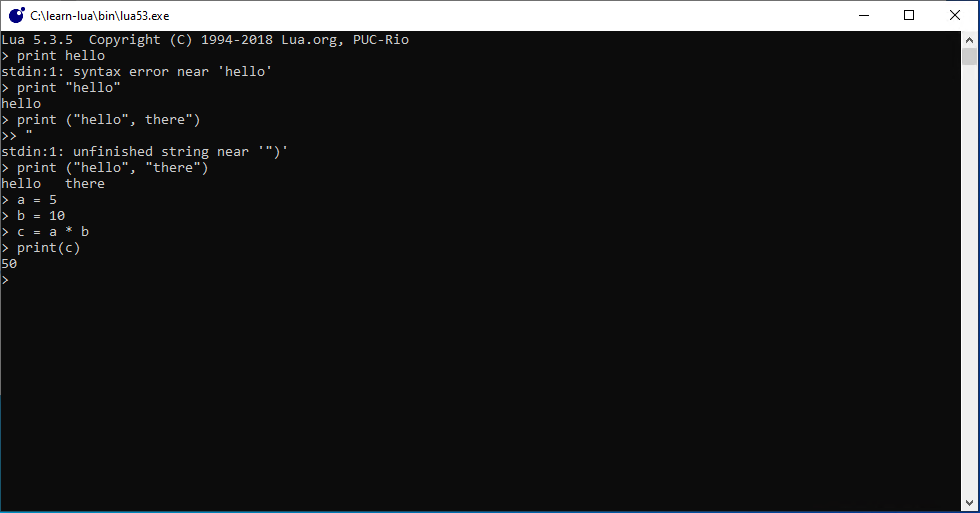
Typing a few things into the Lua interpreter in interactive mode. Some of them worked, some of them printed error messages.
If you type for example print("this is lua interactive mode") into the Lua interpreter and hit Enter this should print this is lua interactive mode on the screen. If there were any typos, you might get an error message instead. You’ll be seeing a lot of error and warning messages while programming, nothing to fear!
This is a useful way to quickly try out one or two lines of Lua code and see the results.
Remember that you can always come back to running Lua this way if you want to test something by itself, without having to worry about either writing a whole program to test it, or messing up the program you’re currently working on.
However, while it’s quick and easy, it’s not a great way to go about writing a whole program. Nothing you type into the interpreter is saved, and you can’t easily edit your mistakes without typing everything out all over again.
In order to start writing real programs, we’ll save them in a .lua file, and launch the Lua interpreter from the command line to run them.
Creating Lua Script Files #
A .lua file is just a simple text file that has been named with a .lua extension instead of .txt, You can edit .lua files with pretty much any text editor, including Windows Notepad.
You can use Notepad if you want, but programming is generally much easier if you use an editor specifically designed for programmers. I’m using Sublime Text to write this tutorial, but there are a variety of decent free options:
- Programmer’s Notepad (free)
- Notepad++ (free)
- Visual Studio Code (free)
- Sublime Text (paid, but free to try indefinitely)
Things like which editor to use can be a source of religious zeal among some programmers or programming communities. Learn from other people’s recommendations, including mine, but there is no right answer. Use whatever you feel comfortable and productive using.
I’ll use Programmer’s Notepad for the next few examples.
An empty file in Programmer’s Notepad
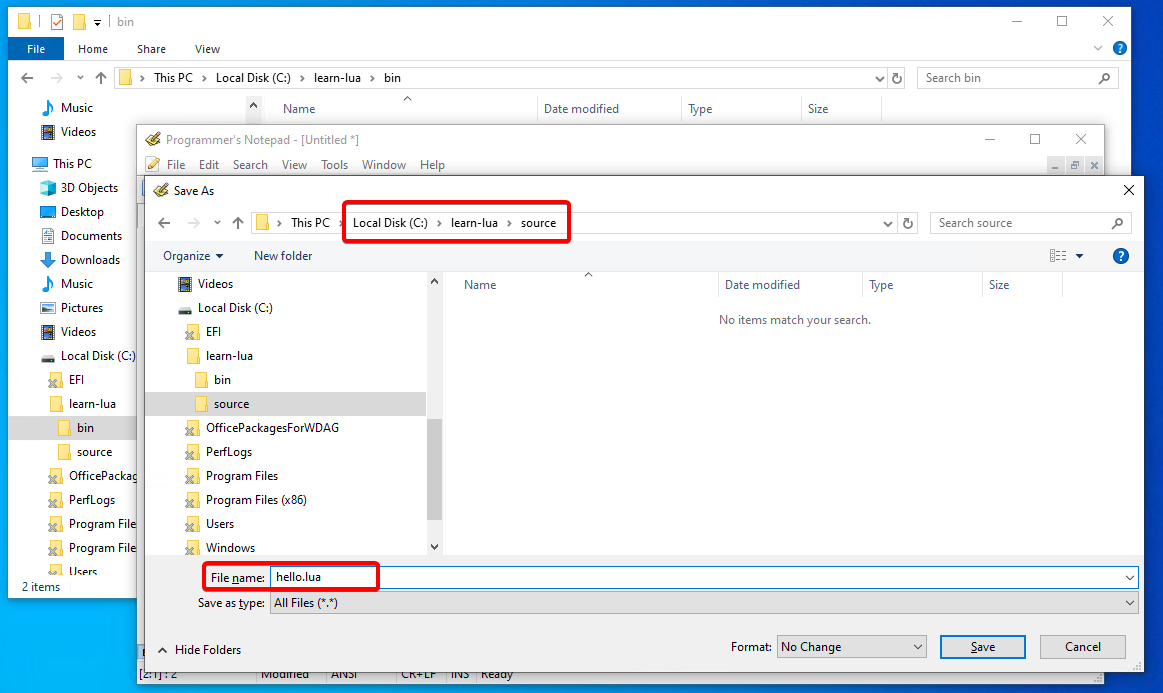
Save the empty file as hello.lua in the source folder that we created earlier.
Once your empty .lua file is saved, type this one line program into the editor…
print("Hello, Dave.")
And then save again. Like with most editors, you can save quickly by hitting Ctrl+S.
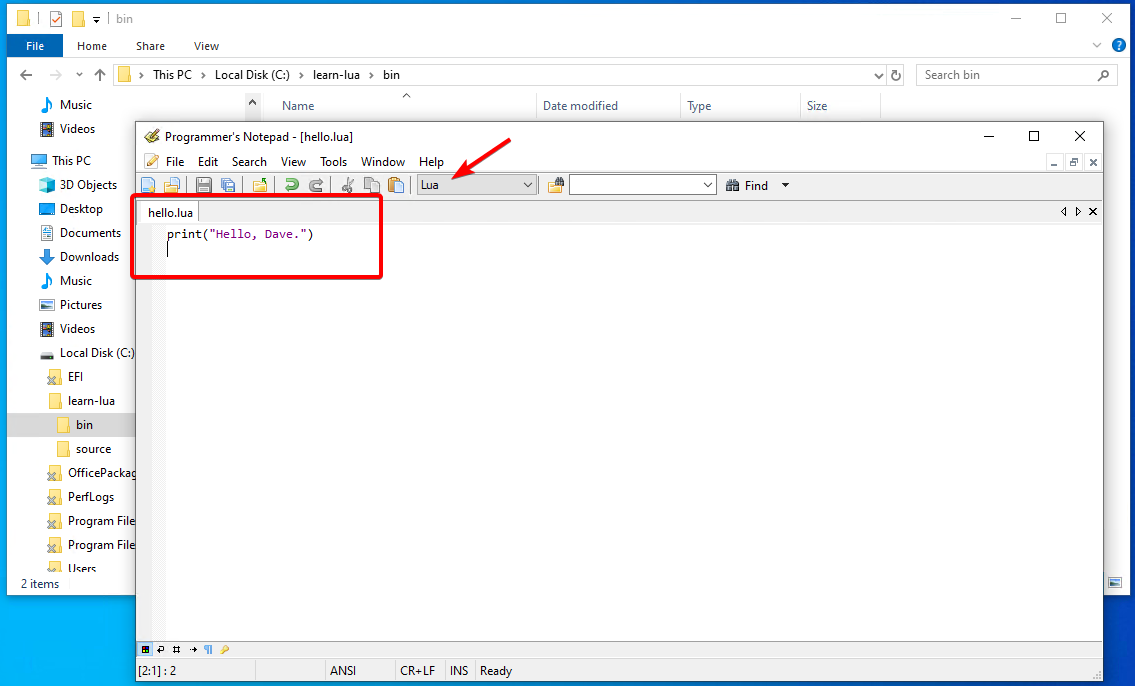
A simple .lua script
You might notice that after you’ve saved the file with the .lua extension, Programmer’s Notepad knows to use the configuration it has for Lua files, and has enable syntax highlighting to show parts of your source code in different colors. This can be a big help when reading long programs, and can also serve as a clue when trying to track down problems.
Running Your Script From The Command Line #
We’re going to learn how to launch our lua program from the command line, which will let us easily run any of our .lua files.
I’ll be using command line and command prompt to mean the same thing. You might also see these referred to as the MS-DOS prompt or DOS prompt elsewhere.
Becoming familiar with using the command line is a valuable skill for programming as well as a variety of other computer related tasks. If you haven’t used it before it can take some getting used to, but should start making sense fairly quickly after a bit of practice.
Launch the Command Prompt, and change into the directory c:\learn-lua.
Step By Step - Running Command Prompt
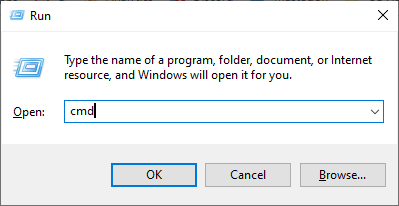
Press Windows+R to open the Run dialog, type cmd and press Enter.
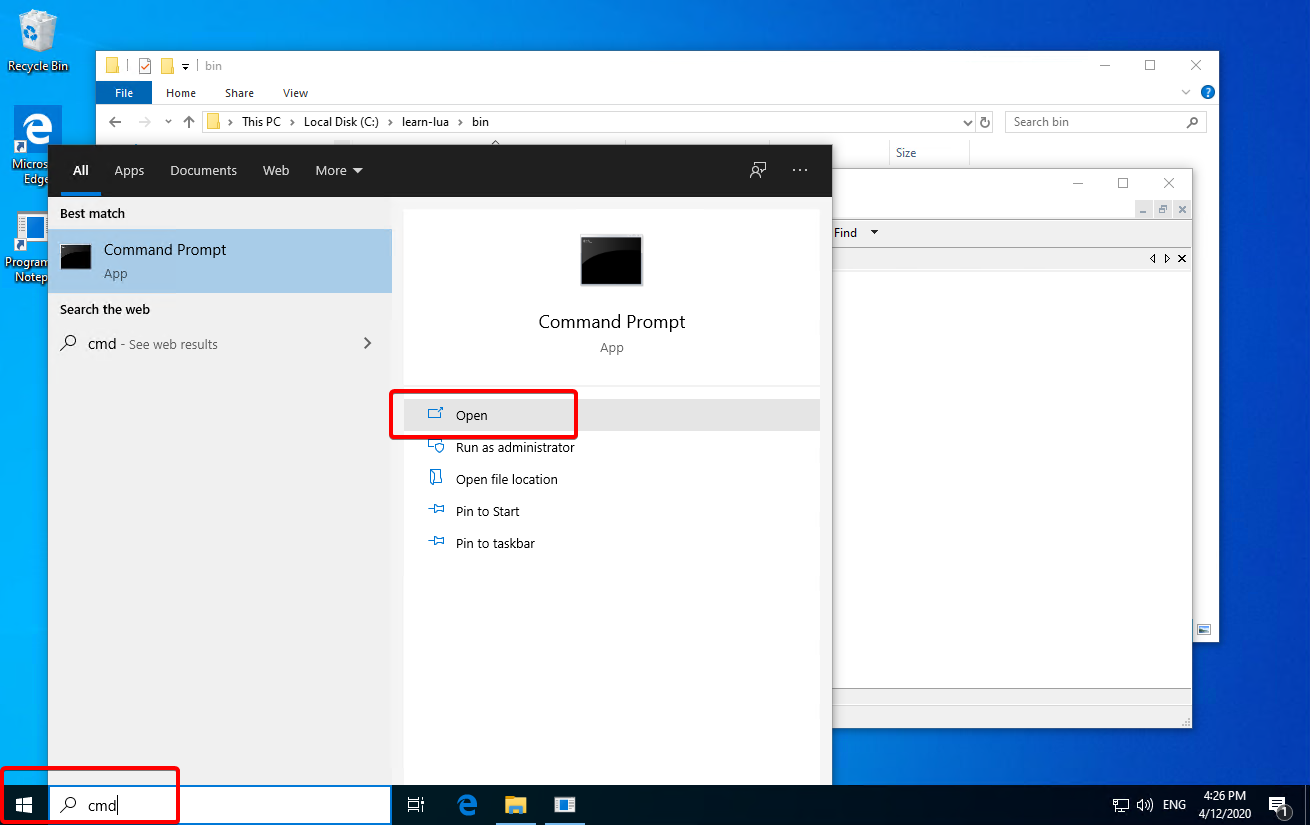
Alternatively you can open the Start menu, type cmd to search, and click on Command Prompt to run it.
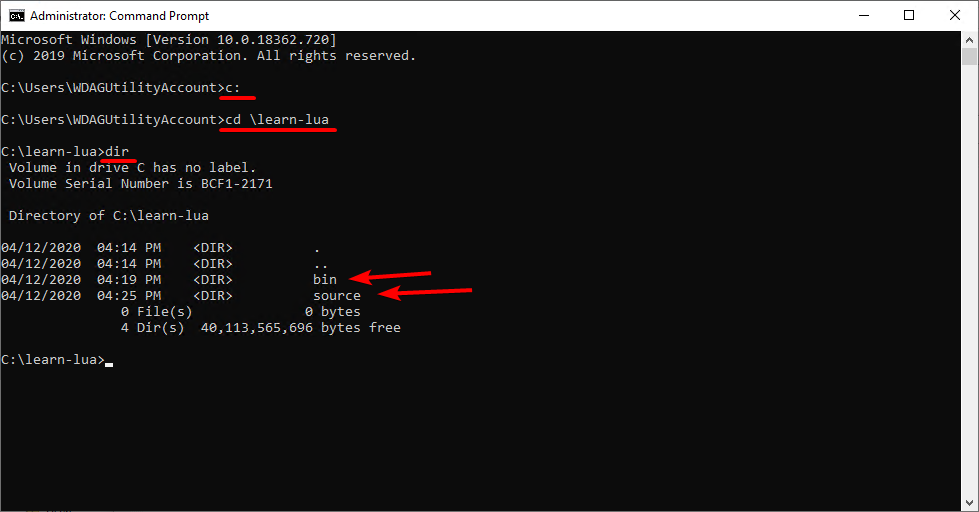
Typing c: will switch to the named drive letter.
Type c: to switch to the drive where you created the learn-lua folder. This is probably unnecessary as your command prompt was likely started on c:, but that’s how you can do it if you need to.
Type cd \learn-lua to Change Directory to the learn-lua folder.
You can use the dir command to list the contents of the current DIRectory. You should see the bin and source folders listed.
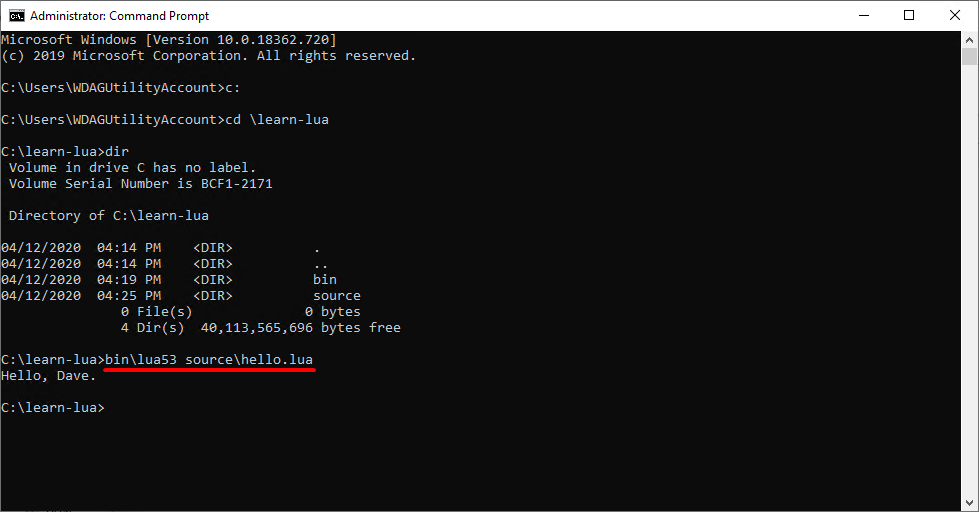
Type bin\lua53 source\hello.lua
Type bin\lua53 source\hello.lua to run lua53.exe which is in the bin directory, and tell it to launch the hello.lua file that’s in the source directory.
If all goes well, you should see the output Hello, Dave.
A Simple Batch File #
We’re going to be running this command a lot, so the simpler we can make it the better. It would be nice if we didn’t have to type the bin and source parts every time we wanted to run one of our Lua files.

Where was lua53 again?
Type cd source to change into the source directory. And then type lua53 hello.lua. You should see an error message.
This doesn’t work because we’re now in the source directory where hello.lua is, while lua53.exe is in the bin directory and we didn’t specify where to find it. Windows won’t search for it by default.
To make this a little simpler, we can create a simple batch file (.bat).
Some Other Options
- We could just put all of our files in one directory instead of having separate
binandsource, but this can get messy fast once you start to work on multiple projects with many files. You can if you want to, I won’t judge.- Another way to solve this problem is to add the
c:\learn-lua\bindirectory to the system PATH environment variable, and if you know what that means, go ahead and do it that way if you’d like.- You could also do nothing, and just type
bin\lua53 source\whatever.luaeach time while working in thec:\learn-luafolder!
If you aren’t familiar with batch files, they are simple scripts containing commands to be run in the Command Prompt. They are especially useful when you have a long or complex command you’d like to run, instead of typing it all out on the command line manually, you can save it in a batch file with a simple name, and run that instead.
Open up your text editor and create a new empty file.
Enter the following:
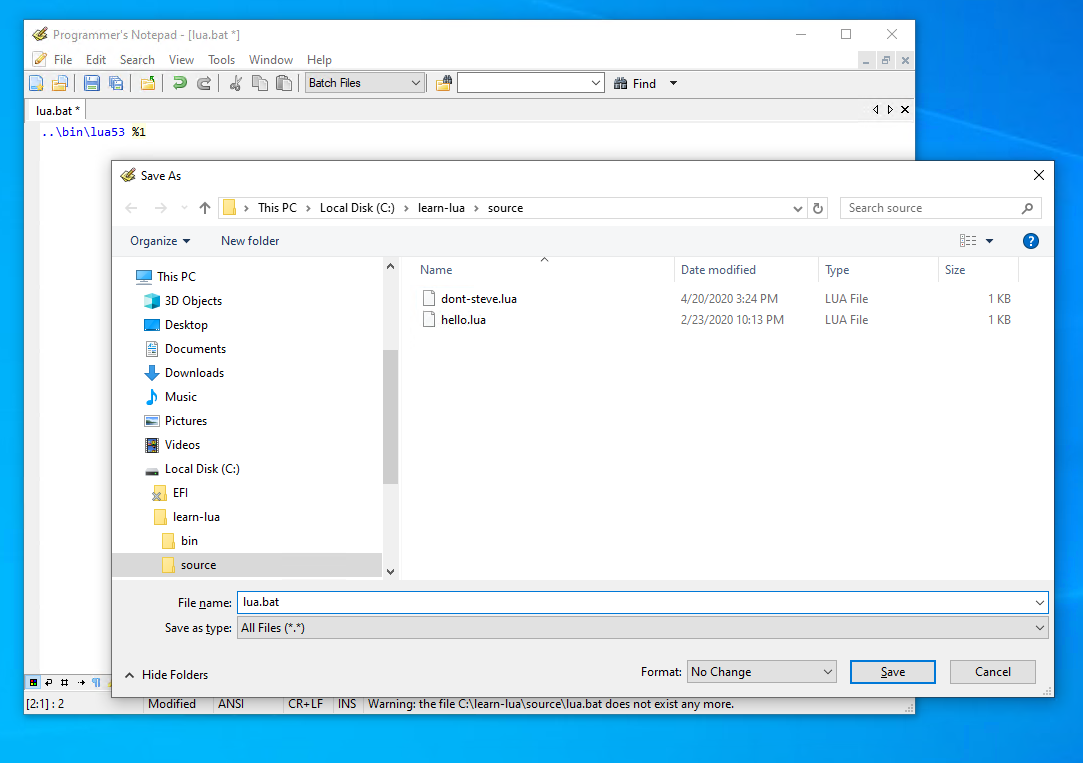
..\bin\lua53 %1
What Does That Mean?
..\bin\lua53is the relative path fromsourcetobin(..here means “back up one directory”)%1means the first parameter that was passed into the batch file, which will be the name of the Lua script we want to run. Here we’re passing it along to the Lua interpreter to load it.
Save your file into the c:\learn-lua\source folder, and name it lua.bat
Switch back to the command line and type lua hello.lua from the source directory.
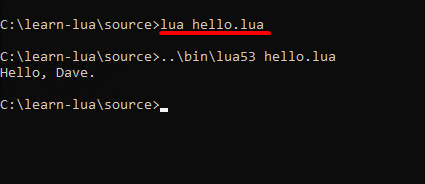
By typing lua here, Windows will automatically find lua.bat because it’s in the current directory, and will pass hello.lua as the name of the script to load.
You might notice that the command inside the .bat file is also printed, which is fine and informative, but we can also hide that by adding an @ at the beginning of the command inside our .bat file:
@..\bin\lua53 %1
Now when you run the batch file, the command inside is run silently, and we only see the results from our program:

The point of all of this is just to make running Lua files as simple as painless as possible, since we’re going to be doing it a lot.
Editing Your Script #
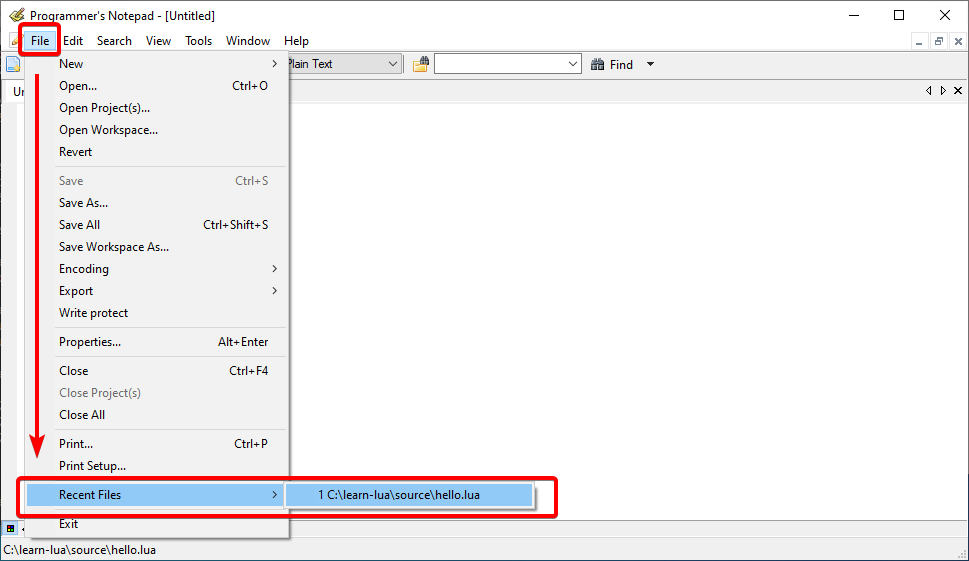
If you’ve closed and re-opened Programmer’s Notepad, you can easily re-open files you’ve been working on recently by clicking File > Recent Files. Other programming editors should have similar functionality.
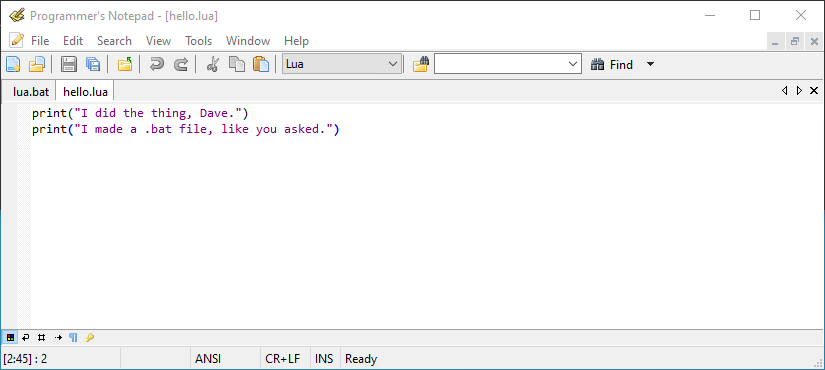
Switch back to editing hello.lua in your editor, and make a few changes.
Replace the existing print line, with two lines:
print("I did the thing, Dave.")
print("I made a .bat file, like you asked.")
Save your file and run your program again from the command line:
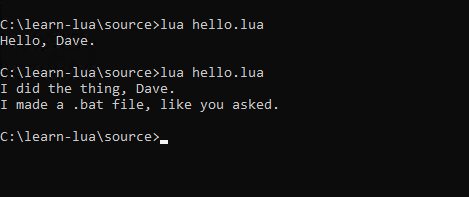
Switch back to the command prompt, and type lua hello.lua again to run the program again and see the new changes.
The program should now display the two new lines that you printed.
This is your basic workflow for programming:
- Make changes in the editor (and save your file!)
- Run the updated program from the command prompt to test the new changes and make sure there are no errors.
- If there are errors (and there will be!), switch back to your editor and double check that there are no typos, no extra or missing
"or)anywhere for example.- Fix any issues in your editor, and switch back to the command line to run the program again and test to see if your fixes worked.
On the Command Prompt, you can also use the Up and Down arrow keys on your keyboard to cycle through recent commands without having to re-type them. Pressing Up then Enter should re-run the last command that you typed.
All Set #
Congratulations! From this point on, we can focus more on actual programming instead of setting up software.
Next - Make A Game!Having Trouble?
Let me know if you had any trouble following these instructions, so that I can improve the clarity of these steps for you and future readers.